DIY Practical Piano Tuning Guide: How To Tune A Piano
In this guide, we will be learning how to tune a piano using a practical approach that is easier to understand. In addition, there will also be a lesson on piano notes and their location on the keyboard using illustrations and visual aids to improve learning. We will also learn important safety measures necessary to avoid short-term and long-term damage to the piano.
We will also be using a digital tuning meter to assist us in learning how to tune a piano. However, we will also learn how to use and improve our listening skills, which is very important to develop if you want to proceed to higher levels in piano tuning.
LESSON 1 (The Piano Keyboard)
Familiarize yourself with the piano keyboard before you learn how to tune a piano

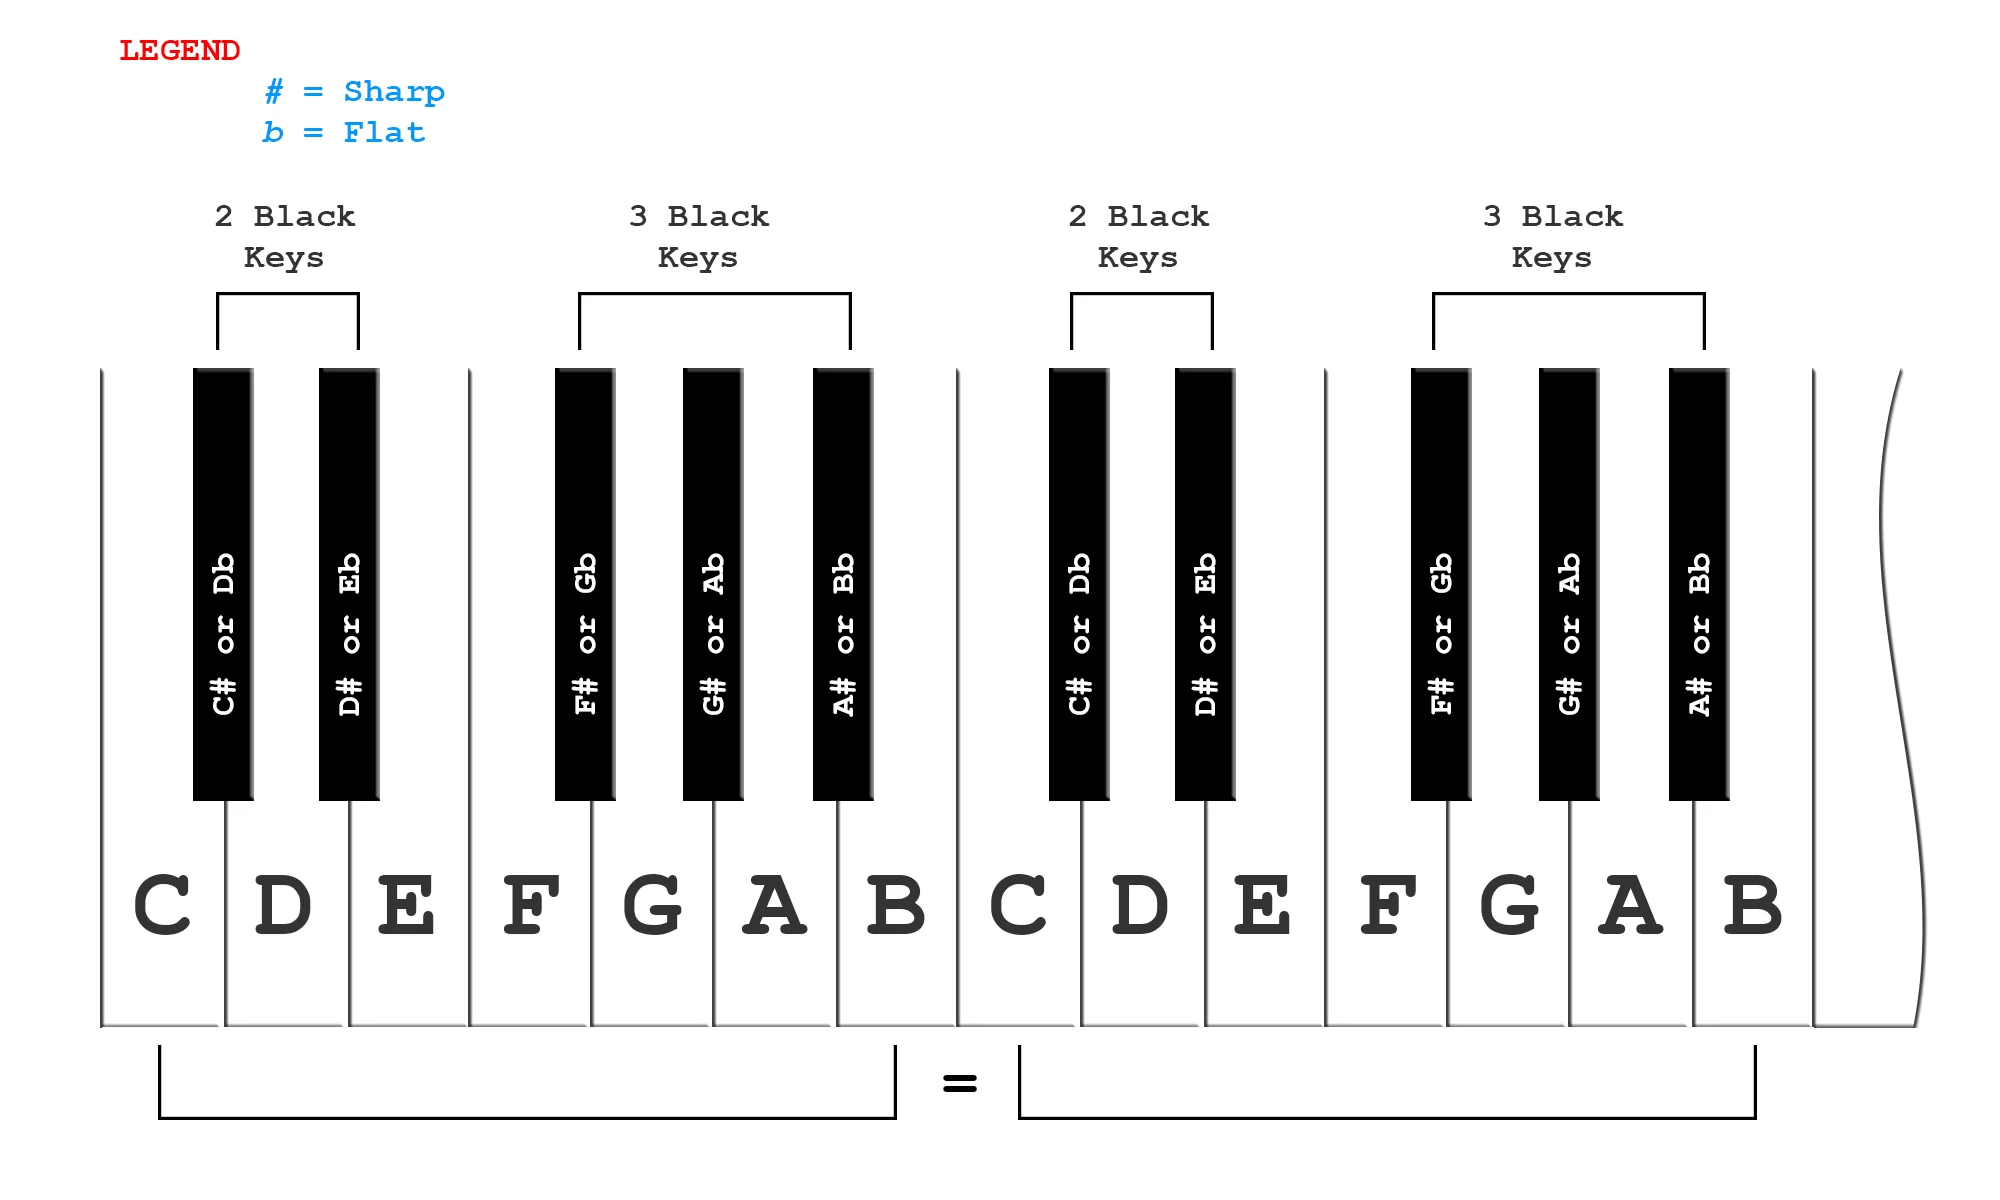
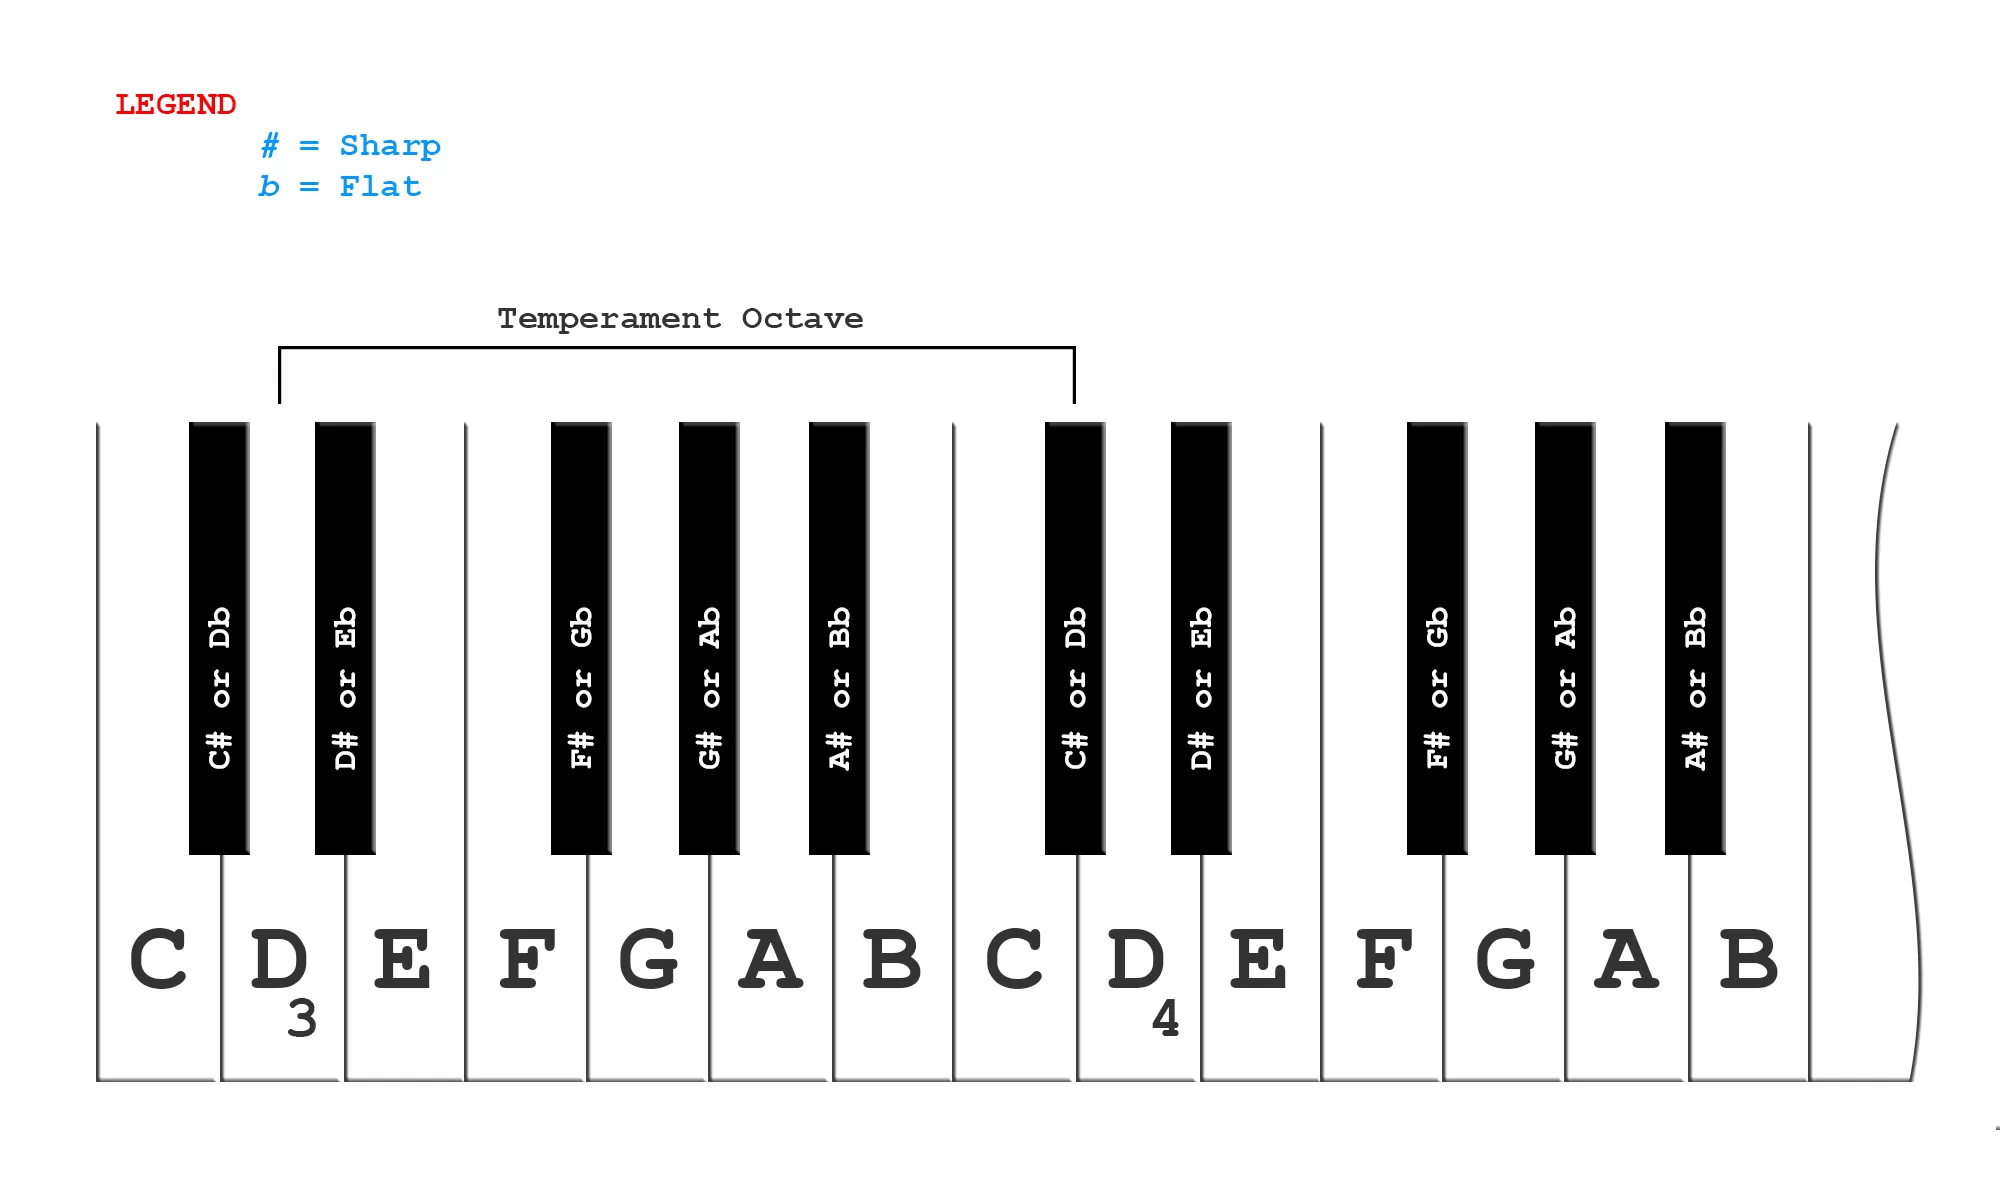
A piano keyboard consists of a series of white and black keys arranged in a specific pattern. The keyboard usually has 88 keys in total, though some smaller pianos may have fewer. The piano keyboard is a meticulously organized set of 88 keys that allows a musician to play a wide range of notes, arranged in a pattern that repeats every octave.
Key Layout:
Black Keys: The smaller, narrower keys are positioned slightly above and behind the white keys. They are arranged in groups of twos and threes, repeating across the keyboard. Each black key corresponds to a sharp (#) or flat (♭) note, depending on the context.
White Keys: The larger, rectangular keys that make up the main body of the keyboard. They are usually made of plastic or ivory and have a smooth surface. Each white key corresponds to a natural note (A, B, C, D, E, F, G).
Pattern:
Repeating Octaves: The keys are arranged in a repeating pattern of 12 notes, known as an octave. Each octave includes seven white keys and five black keys. The pattern starts with C and ends with B.
Visual Cues: The grouping of black keys into sets of twos and threes helps players identify the notes quickly. For example, the white key immediately to the left of a group of two black keys is always C, and the one immediately to the left of a group of three black keys is always F.
Key Count:
88 Keys: A standard piano has 88 keys, with 52 white keys and 36 black keys. These span over seven full octaves plus a few additional keys on either end for lower or higher notes.
Sound:
Lower Pitch: The keys on the left side of the keyboard produce lower-pitched sounds, while those on the right produce higher-pitched sounds.
LESSON 2 (Piano Tuning Tools)
In order to learn how to tune a piano, you must have the necessary tools.
Piano tuning is a precise art that requires the right tools to achieve optimal sound quality. These basic tools allow a piano tuner to perform the delicate task of ensuring that each note on the piano is in good harmony with the others, maintaining the instrument’s beautiful sound. Below are the basic tools that you will need in this online course.
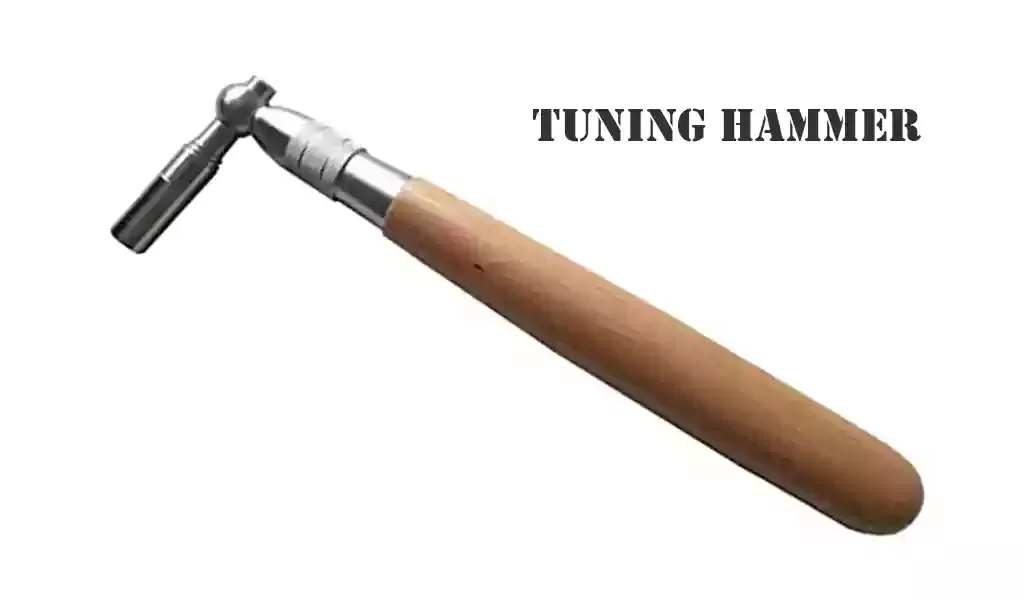
Tuning Hammer
- Description: The tuning hammer, also known as a tuning lever, is the most essential tool in piano tuning. It looks like a small wrench with a wooden or metal handle, and its head fits onto the tuning pins that control string tension.
- Function: The tuner uses the hammer to adjust the tension of the piano strings by turning the tuning pins, thus altering the pitch of each note.

Mutes
- Description: Mutes are small tools made of rubber, felt, or leather. They come in various shapes and sizes, including wedge mutes, temperament strips, and single mutes.
- Function: Mutes are used to silence specific strings while tuning others. For example, when tuning a piano with three strings per note (a “trichord”), mutes can be placed on two of the strings to isolate the sound of the string being tuned.
How to use the Rubber Mutes
There are no strict rules on how to mute the strings. You can mute the strings in any way you want as long as it will not hinder your comfort while tuning. See the images below for some examples of how to mute a string.
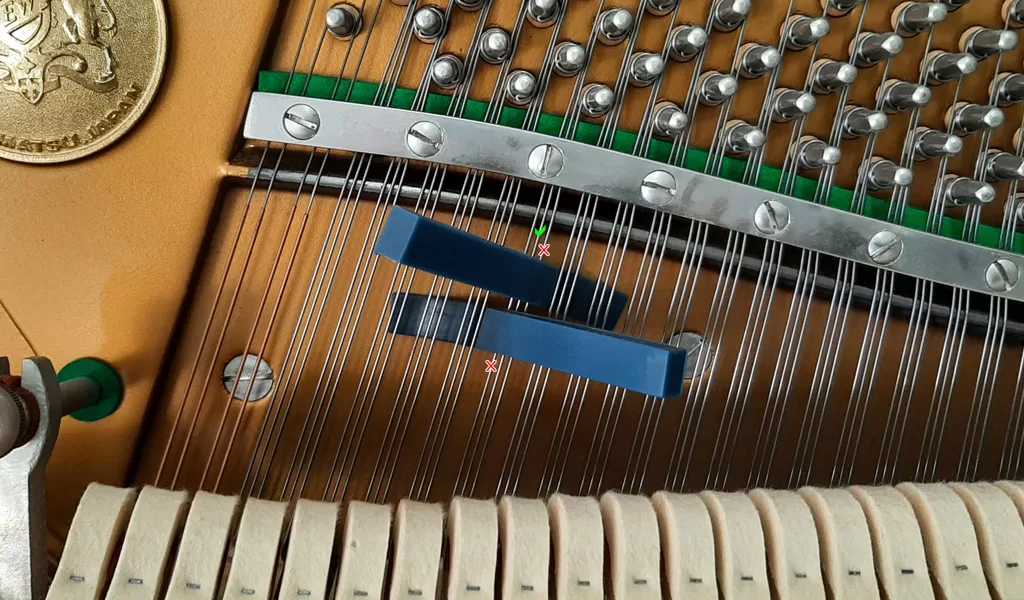

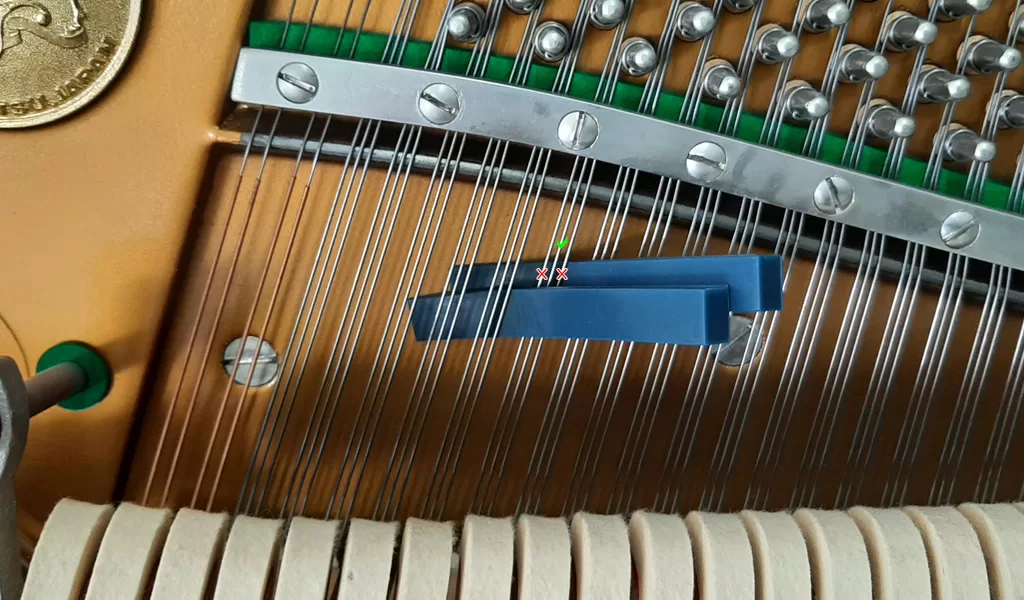
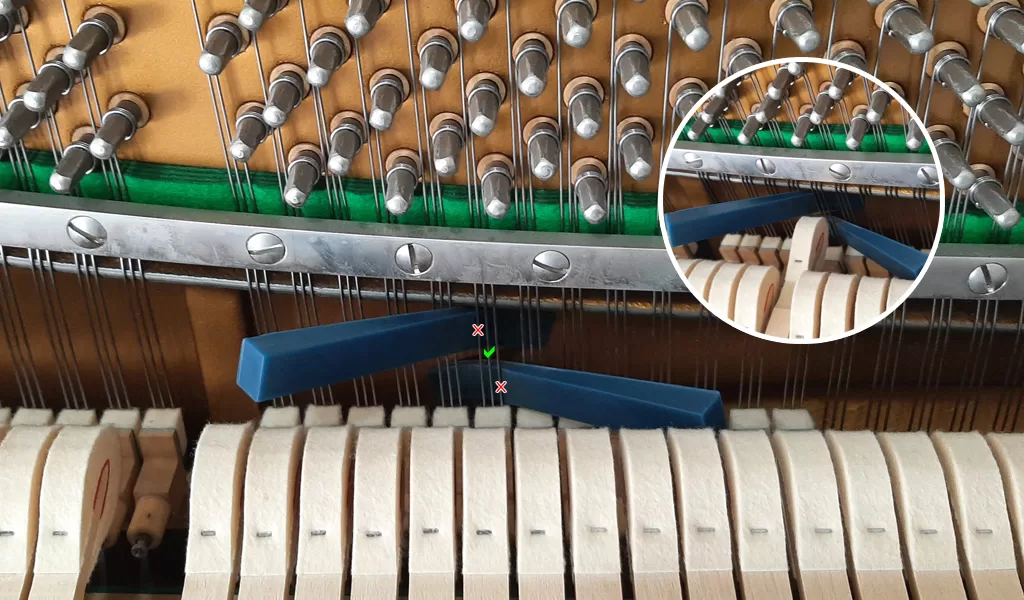

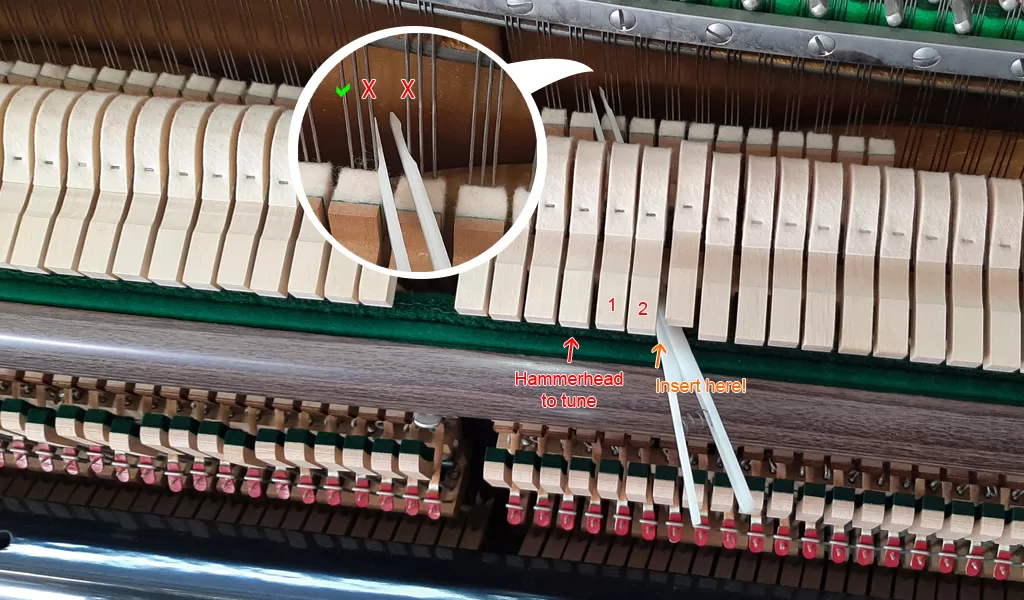
Papp’s Treble Mute
- Description: The Papp’s treble mute has a spring-loaded tweezer mechanism that makes muting the treble portion easier. It saves a lot of time while tuning an upright piano’s treble section.
- Function: If you want to have your center string muted along with one other string, you can close the mute and place it between the left and center strings or the right and center strings. Because of the spring feature, you can also mute just the right and left strings, leaving the center unmuted.
How to use the Papp’s Treble Mute
Insert the PAPP’S Mute between the 2nd and 3rd hammerhead to the left or right of the note you are currently tuning. You can insert it between the hammerhead shanks. (See images below)


Temperament Strip
- Description: This is a long strip of felt or rubber.
- Function: The temperament strip is inserted between the strings to mute certain strings across several notes at once, which is particularly useful when setting the temperament (the tuning of intervals in the middle octave of the piano).

Piano Tuning Software/Apps
- Description: Modern piano tuners may use specialized software or mobile apps designed to analyze the pitch and provide precise tuning instructions.
- Function: These tools provide visual feedback on the pitch and help ensure accuracy across the entire keyboard. (We will be using digital tuning apps only to set the temperament).
LESSON 3 (Safety Measures)
Tuning Hammer Positioning
Proper positioning of the piano tuning hammer is crucial for accurate and safe tuning of the piano. The tuning hammer, also known as a tuning lever, is a specialized tool used to adjust the tension of the piano strings by turning the tuning pins. Correct positioning helps ensure that you can apply the necessary torque without damaging the tuning pins, strings, or the pin block.
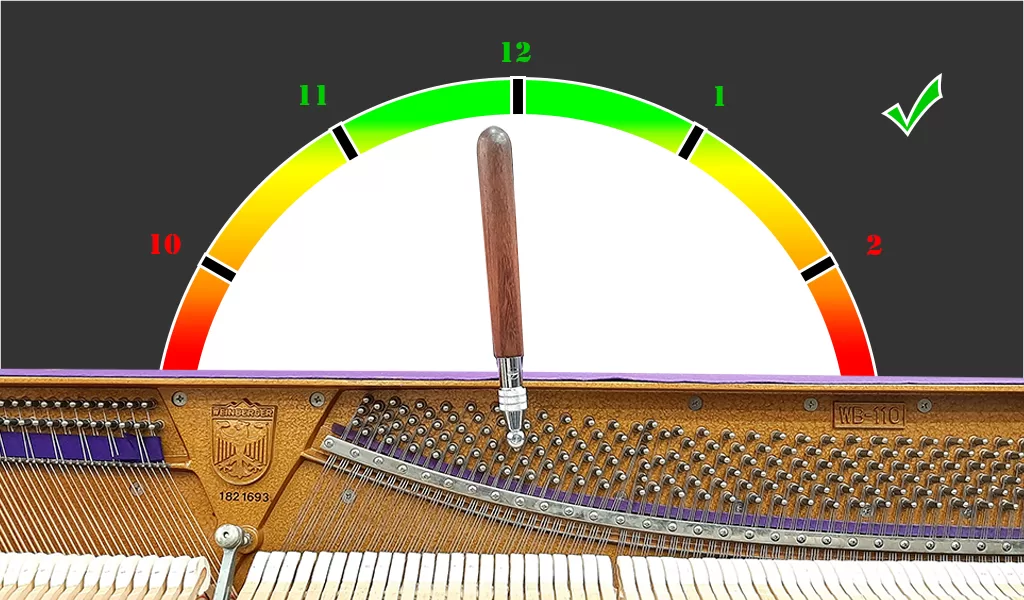

In this beginner’s course, we will be practicing the optimal tuning hammer position parameter set for beginners.
- Optimal Position = 11 a.m. to 1 p.m. (Clock Scale)
We must practice using this parameter to ensure proper tuning hammer action and manipulation.
Arm & Posture


Proper arm posture is crucial when manipulating a tuning hammer while tuning a piano. This not only ensures precision in tuning but also helps prevent strain and injury over time. The key aspects to consider for correct arm posture are written below.
1. Relaxed Shoulders
- Position: Keep your shoulders relaxed. Tension in the shoulders can travel down the arm, making it harder to make subtle adjustments.
- Importance: Relaxed shoulders allow for smoother and more controlled movements, which are essential for fine-tuning.
2. Hand Grip
- Grip: Hold the tuning hammer with a firm but relaxed grip. Avoid gripping too tightly, as this can cause unnecessary tension and reduce control. Your hand should cradle the handle, allowing for subtle adjustments with minimal effort.
- Importance: A balanced grip allows for both stability and flexibility in movement, making it easier to perform fine adjustments.


3. Forearm Alignment
- Position: Your forearm should be positioned parallel to the body of the piano. This will ensure the correct rotation of the tuning pin when adjusting and tuning the strings. Avoid locking the elbow joint, as this can restrict your movement.
- Importance: Proper elbow placement helps in maintaining a stable yet flexible control over the tuning hammer. It also allows for better leverage when turning the pins.
4. Forearm Movement
- Movement: The movement of the tuning hammer should primarily come from the forearm and wrist rather than the fingers. Use your forearm to initiate the motion, with the wrist following naturally.
- Importance: This approach ensures more consistent and controlled movements, reducing the likelihood of over-twisting or under-adjusting the tuning pins.
5. Wrist Alignment
- Position: The wrist should be aligned with the forearm, avoiding excessive bending up, down, or sideways. A neutral wrist position ensures that the force applied through the hand is directly transferred to the tuning hammer.
- Importance: Correct wrist alignment minimizes the risk of repetitive strain injuries like carpal tunnel syndrome, and it enhances the precision of your movements.

6. Body Positioning
- Position: Stand close enough to the piano to maintain an upright posture without leaning forward or backward excessively. Your feet should be firmly planted on the ground, providing a stable base for your movements. The note key that you are tuning should be at the edge of your left hip.
- Importance: A stable body position allows for better control and reduces the strain on your back and neck during long tuning sessions.
7. Smooth Movements
- Technique: Movements should be smooth and deliberate. Avoid jerky or rapid adjustments, which can cause inaccurate tuning and increase wear on the tuning pins. When putting or removing the tuning hammer from the pins, do it carefully and slowly to avoid collisions that might result in tuning slippage.
- Importance: Smooth, controlled movements ensure that each adjustment is precise, maintaining the integrity of the tuning.
Conclusion
Maintaining proper arm posture while manipulating the tuning hammer is essential for accurate and consistent piano tuning. It also plays a significant role in preventing strain and injury, particularly during prolonged tuning sessions. By focusing on relaxed shoulders, proper elbow and wrist alignment, a balanced grip, and smooth forearm movements, you can ensure precision and comfort in your tuning practice.
LESSON 4 (Tuning Technique)
The Tuning Technique
Before you start the “Tuning Routine”, you must check if your tuning hammer is in the correct pin to tune the desired string. You must check every time before tuning a string to avoid future confusion during the tuning procedure. Once you confirm that your tuning hammer is on the correct pin, you can start the “Tuning Routine”. Mastering the tuning routine will help make your tuning more stable. Study the video demonstration of the “Tuning Routine” and familiarize yourself with the technique.
The Routine
(HIT – TURN – HIT & LET GO)
- HIT
- HIT (Press and hold) the key of the note that you are tuning.
- You can HIT (press and hold) the key every 2 -3 seconds to ensure you have a good, strong sound and not a fading sound while tuning.
- HIT (Press and hold) the key of the note that you are tuning.
- TURN
- Turn the tuning hammer clockwise (to the right ->) using one smooth stroke to raise the pitch until you get the desired tuning.
- Once you get the desired tuning, DO NOT let go of the pressure and the tuning hammer. Hold and keep it there!
- Turn the tuning hammer clockwise (to the right ->) using one smooth stroke to raise the pitch until you get the desired tuning.
- HIT & LET GO
- Firmly HIT (press and hold) the key of the string you are tuning, then LET GO of the tuning hammer.
Practice this tuning routine every time you tune a piano to develop your muscle memory and improve your tuning quality and stability.
LESSON 5 (The Piano Tuning Procedure)

Practical Piano Tuning Procedure: How To Tune A Piano
Piano tuning is a meticulous process that requires skill and a profound understanding of the instrument’s mechanics. The goal is to adjust the tension of the piano strings so that each note produces the correct pitch.
Brief History
The Prime Piano tuning procedure, which outlines how to tune a piano, is a blend of technical skill and auditory precision that has been continuously improved and tested by three generations of piano technicians. Alcordo & Sons used this procedure, a family-run piano repair and rebuilding shop in the Philippines. At present, only Pro Piano Tuner uses this piano tuning procedure. Pro Piano Tuner is a 3rd-generation piano technician from Alcordo & Sons.
Prepare your piano tuning tools and precisely follow the guides and instructions below.
Piano Tuning Step 1
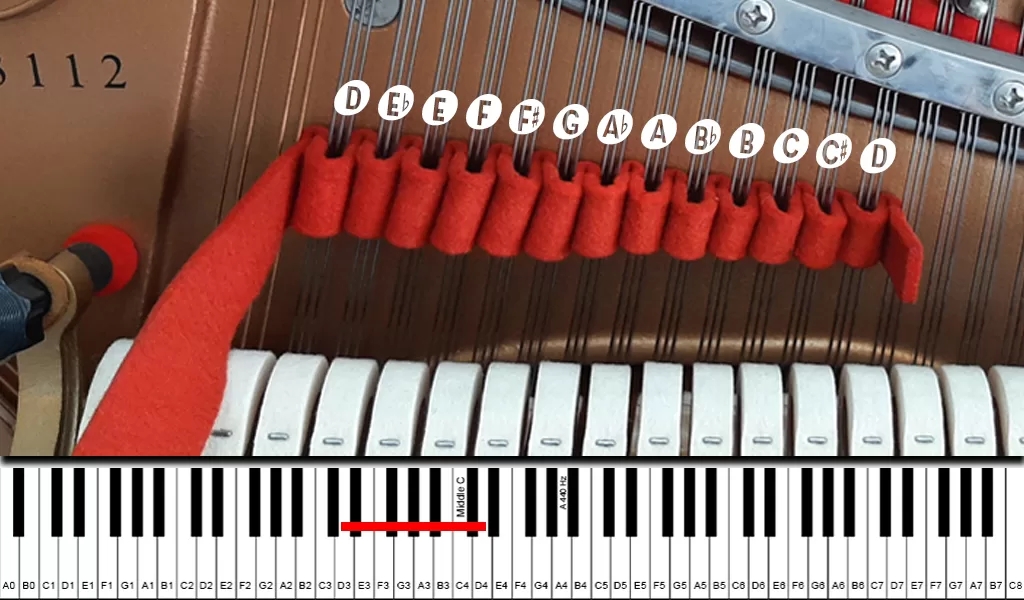
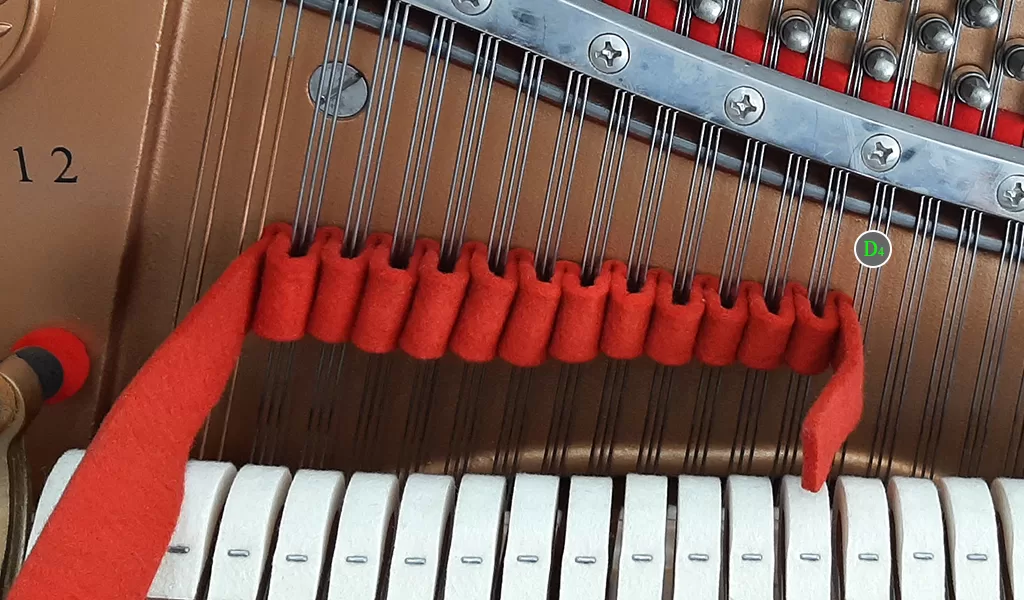
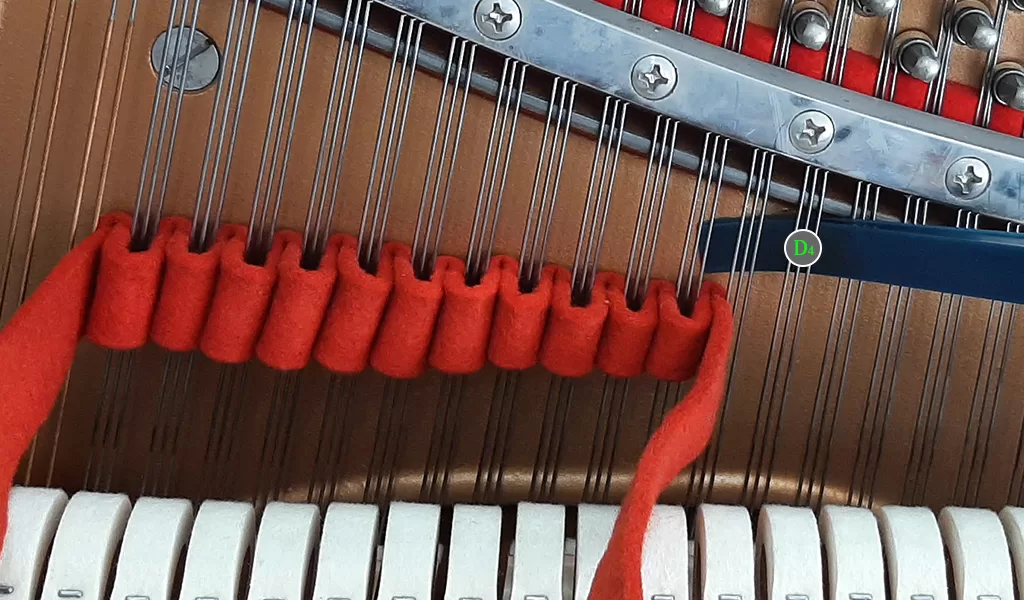
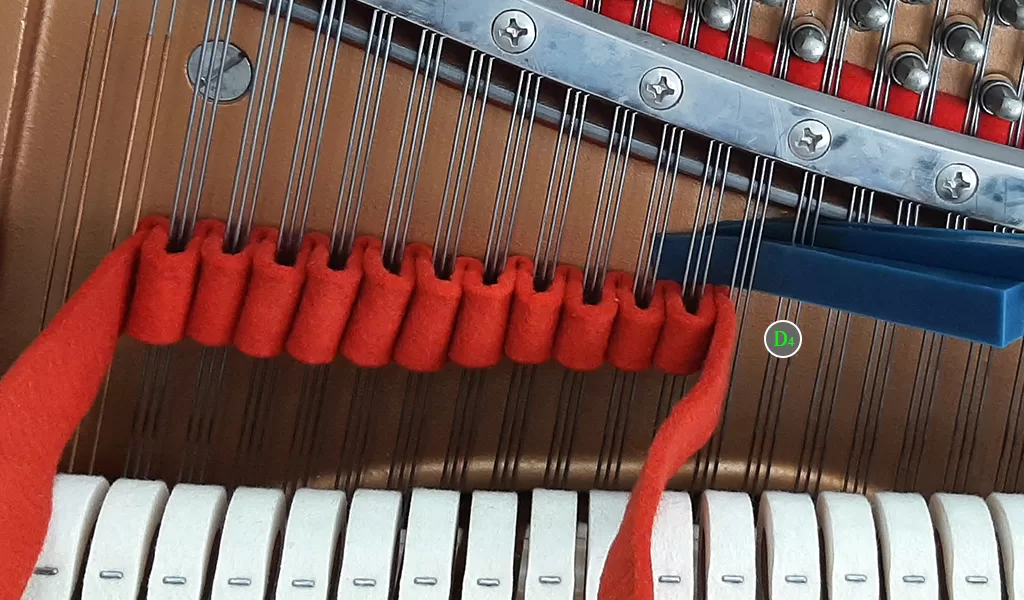
Apply Temperament Strip
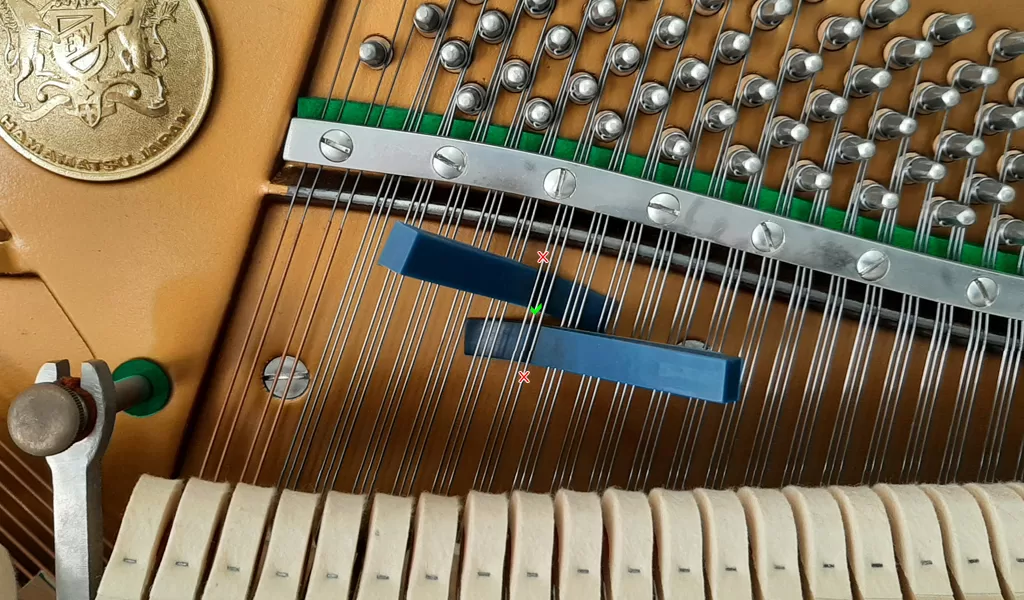
- Appy the temperament strip to the strings from D3 up to D4 to mute the left and right strings of each note.
- Use the PAPP’S Mute. A muting tool that is made out of plastic or nylon, and looks like a clip, to push the temperament strip into place in between the strings.
- Be very careful not to put pressure on the hammerheads while performing this procedure.
- Make sure that you have enough loops on the temperament strip before pushing it into place. If you do not have enough loops on the temperament strip, it might also partially mute the center string.
Piano Tuning Step 2
Setup Temperament Octave
All the steps in the piano tuning process are very important. However, setting up the temperament octave is a crucial part of the piano tuning process. Because the temperament octave serves as the foundational reference for tuning the rest of the instrument, we therefore highly recommend concentrating and spending more time in the setting of the temperament octave.
In setting up the temperament octave, we will tune the “Center” strings of D3 up to C#4 with the help of a digital tuning device.

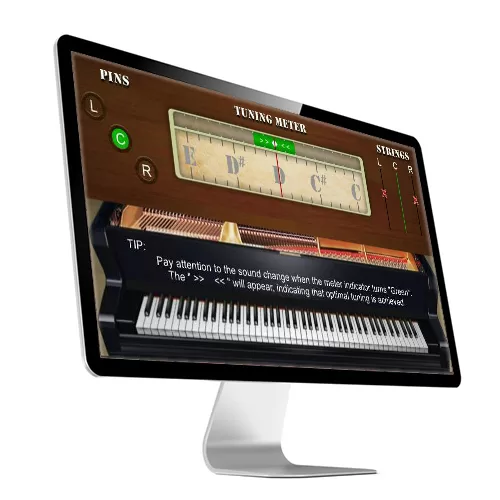
Understanding Your Digital Tuning Device
Before using your digital tuning device, you must first learn and understand the details on the device screen. There are many types and designs of electronic tuning devices. In this beginner course, we will be using an analog design illustration.
In learning how to tune a piano, you will be acquiring a special skill set. It is a perfect science in theory. However, it is not a perfect science in application. In practical piano tuning using an electronic piano tuning device, you must understand that even if you are using a digital piano tuning meter, there is no “Perfect Tuning”. There is only “Optimal Tuning”. There will always be discrepancies. That is why in this lesson, we will be setting the limit of what is “Acceptable Tuning” and what is “Not Acceptable Tuning”. So we can achieve the most important thing while learning how to tune a piano. That is the overall balance and sound quality after the tuning is complete.
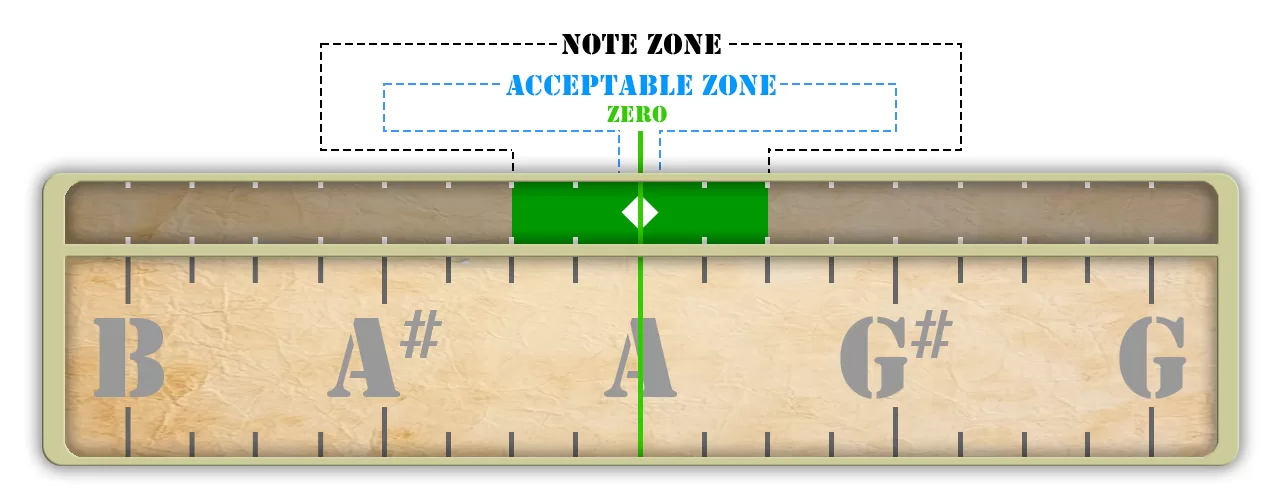
For this practical piano tuning for beginners lesson, we will focus on the most important areas of the electronic tuning device. We have assigned zones for these areas. We call these areas “Tune Zones”. There are three tune zones. The “Note Zone”, “Acceptable Zone”, and “Zero”.
For illustration please refer to the image above
- NOTE ZONE
- This is the green rectangular area that you see on the display of your digital tuning device.
- This rectangular area turns from a red to a green color when your tuning is already inside the frequency spectrum of the desired note.
- Tuning notes in the “Temperament Octave” just in the note zone calibration will not produce an acceptable temperament octave and overall piano tuning quality.
- ACCEPTABLE ZONE
- The diamond-shaped figure located exactly at the center of the “Note Zone” is called the “ACCEPTABLE ZONE”.
- The frequency spectrum of the acceptable zone starts from the left edge to the right edge of the diamond.
- Setting the “Temperament Octave” with notes tuned inside the acceptable zone spectrum will produce an acceptable temperament octave and overall piano tuning quality.
- ZERO
- Zero is the point that is the exact center of the diamond inside the Acceptable Zone.
- When the Note Zone color is green, and the meter needle is exactly right in the middle of the diamond, this signifies that you are in the best tuning you can make.
How to set the Temperament Octave
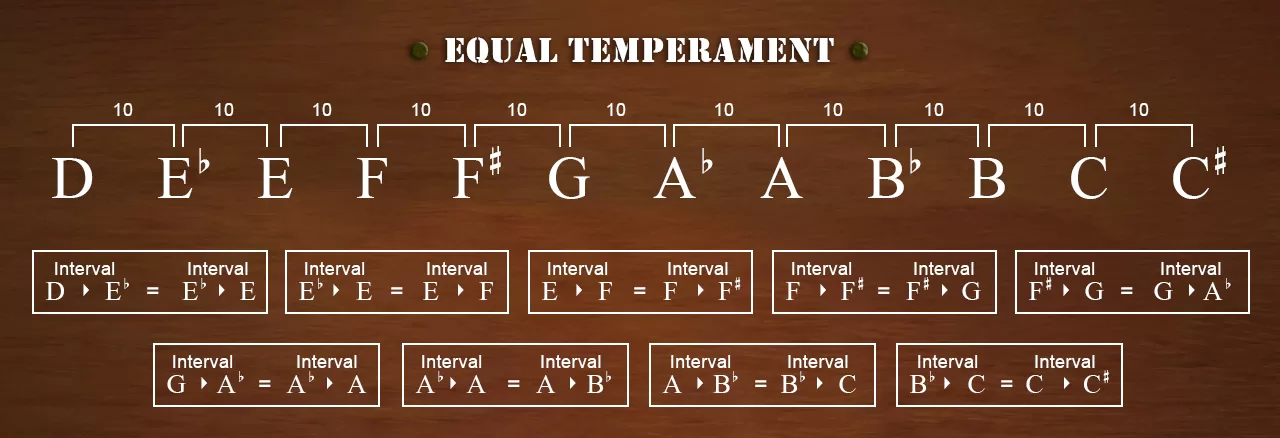
In setting up the “Temperament Octave” using a digital tuning device or phone app, first, we must understand that an electronic tuning device or phone app is designed and calibrated for “Equal Temperament” by default. “Equal Temperament” is a tuning temperament calibration where the intervals between notes are equally spaced. (See illustration below)
To achieve the best temperament tuning using a digital tuning device as a guide, you must tune the notes in the temperament octave at the same calibration. Or at least, the closest you can make to a uniform adjustment for all the notes in the temperament octave.
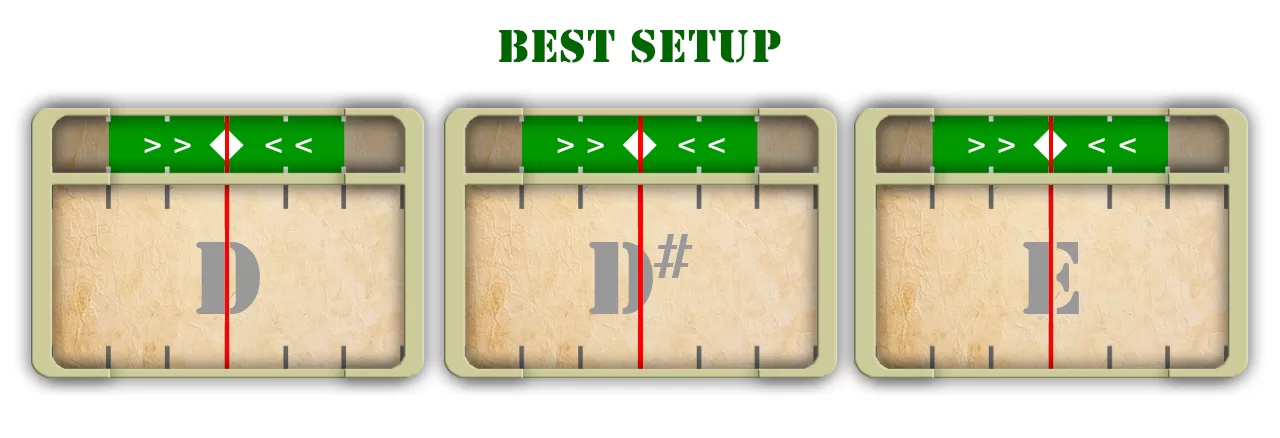
Desired Temperament Setup
This illustration shows that the notes are tuned with the same calibration on the “Zero”. Therefore, the intervals or spaces between notes are the same. In practical terms, we would say that the notes are tuned to the same “Picture”.
If you look at the equal temperament practical description image, the “Picture” is completely justified. All the notes in the temperament octave are spaced equally with the same interval.
This setup will not be easy to achieve as a beginner. However, with constant practice, you will be able to improve your piano tuning temperament setting gradually and set your own standard and quality.
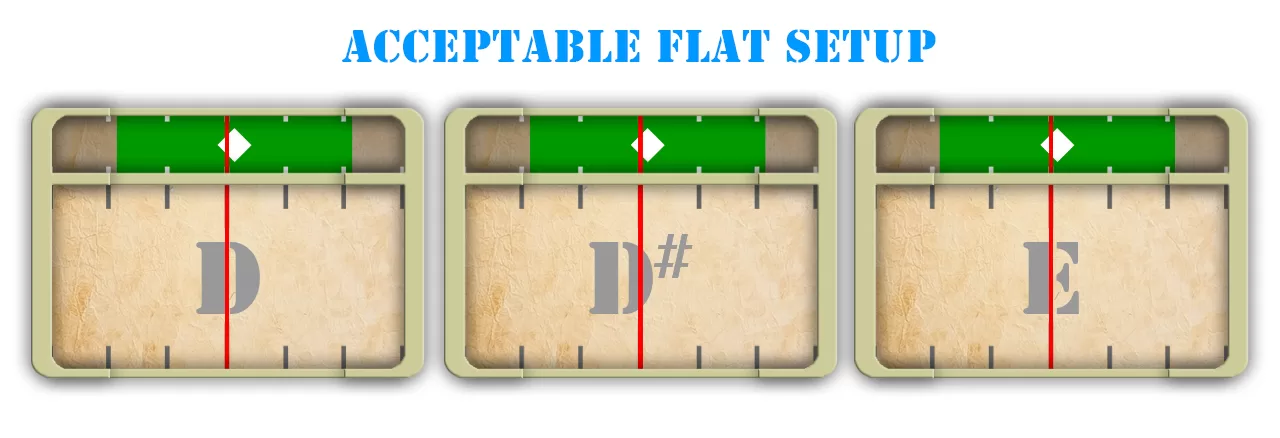
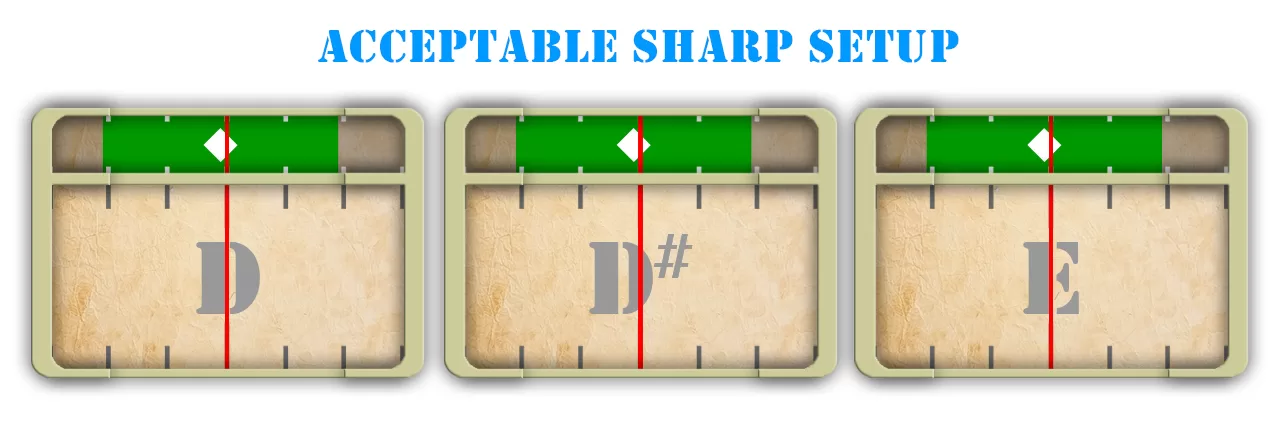
Acceptable Temperament Setup
In this illustration, the notes are not tuned at “Zero”. In one illustration, the notes are tuned sharp (#), leaning towards the right edge of the diamond, and the other is tuned flat (♭), leaning towards the diamond’s left edge. However, the tuning is still inside the “Acceptable Zone” and they have the same “Picture”. Therefore, the interval or space between notes remains equal. In this case, you still achieved “Equal Temperament”.
- Note:
- If you tune the 1st note of the temperament octave flat (♭) of “Zero”, or sharp(#) of “Zero”, then you have to tune the rest of the notes the same way to keep the interval between notes equal.
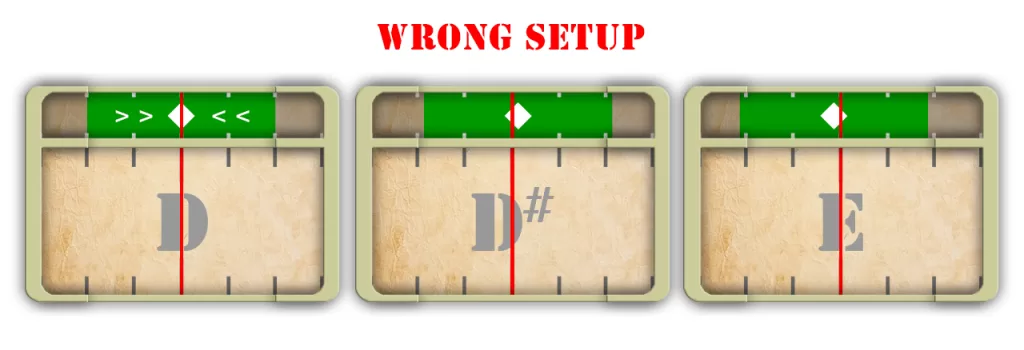
Wrong Temperament Setup
This illustration shows that the notes are not tuned with the same calibration or “Picture”. Although they are all in the “Acceptable Zone”, notice that the note “D” is tuned at “Zero”, the note “D#” is tuned flat (♭) off “Zero”, and the note “E” is tuned sharp (#) off “Zero. This illustrates that the intervals or spaces between the notes are not the same. Therefore, you did not achieve “Equal Temperament”.
Tuning the Temperament Octave
In this beginner course for practical piano tuning, our “Temperament Octave” will be assigned as “D3 to C#4“. We assigned this temperament octave because this is also the temperament octave that we are using for our “Aural Piano Tuning Course”. An advanced course that teaches how to tune a piano by ear without the help of an electronic tuning device or phone app. We recommend that you familiarize yourself with this temperament octave in case you want to learn “Aural Piano Tuning” in the future.
Tune the center strings
- Tune the center strings of the notes from D3 to C#4 in the temperament octave with the help of your digital tuning device starting with the first note (D3).
- Make sure that you use the “Tuning Routine” so you can achieve good tuning quality and stability.
- Take note that the left and right strings of the notes are still muted by the temperament strip, as shown in the illustration.
- At this point, you will know what kind of temperament setup is possible for the piano that you are tuning. Whether you can do the “Best Setup” or the “Acceptable Flat (♭) or Sharp (#) Setup will greatly depend on the health and condition of the piano.
- The “Best Setup” must always be our goal. However, it is not always possible. Sometimes we have to settle for the “Acceptable Temperament Setup”. We just have to make sure that we keep the intervals between notes equal or as close to equal as we can. Remember, there is no “Perfect Tuning”. There is only “Optimal Tuning”.
- After tuning the center string of the last note (C#4) in the temperament octave using your digital tuning device, you must re-check all the notes and adjust if needed.
Study the video clip provided to help guide you in tuning the strings.
Pay attention to all the details in the video.
Piano Tuning Step 3
Extending Octaves
Extending octaves in the high register of the piano.
In this lesson, we will be learning how to tune octaves. We will develop our listening skills to determine if the strings are tuned or out of tune. We will not depend on the digital tuning device, but learn the sound quality difference between a tuned note and an out-of-tune note. (The digital tuning meter in the video must be treated as a visual aid only. It would be best if you focused on listening to the sound quality, and not looking at the meter).
In this practical piano tuning course, we use the “Description Technique” to distinguish whether a note is tuned or out-of-tune. We describe the sound quality of an out-of-tune note “Dirty Sound”. And we describe the sound quality of a tuned note as “Clean Sound”. (Refer to the instructional video “Dirty vs. Clean”)
“Dirty Sound” is a sound quality that is not clear. It is not defined. And it is not clean. In other words, it is a bad sound quality. Sound quality-wise, “a dirty sound”Dirty Sound” is an indication that the strings are out of tune. A “Clean Sound”, is the quality of sound that we will hear when the notes are already in tune. The sound quality will be clear, well-defined, and clean. When you hear the “Clean Sound”, it is a very good indicator that the strings are already at the “Zero Zone” and the note in tune.
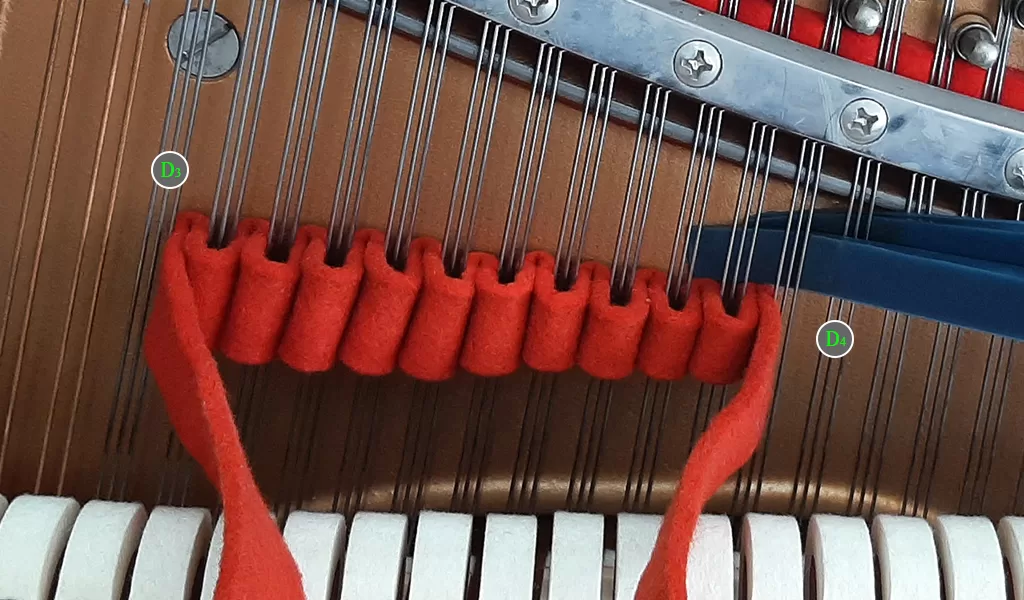
Step 3 (Extending D3 to D4)
Tune the center string of D4 using D3 as a reference guide. At this point, the left and right strings of D3 and D4 are still muted by the temperament strip.
- Press and hold D3 with your “Little Finger” then press and hold D4 with your “Thumb” while holding D3 at the same time to start tuning D4.
- DO NOT FORGET to use the “Tuning Routine“.
- Make sure that you have a good strong sound when you press the piano keys to ensure that the strings are vibrating sufficiently. Good strong sound will help us determine when the sound quality changes from “Dirty” to “Clean”.
- Do not wait until the sound fades away. You can press the keys every 2 – 3 seconds to ensure you always have good sound volume and string vibration while tuning the piano.
Listen to the sound samples below to review the difference between a “Dirty Sound” and a “Clean Sound”.
Dirty Sound Example
Clean Sound Example
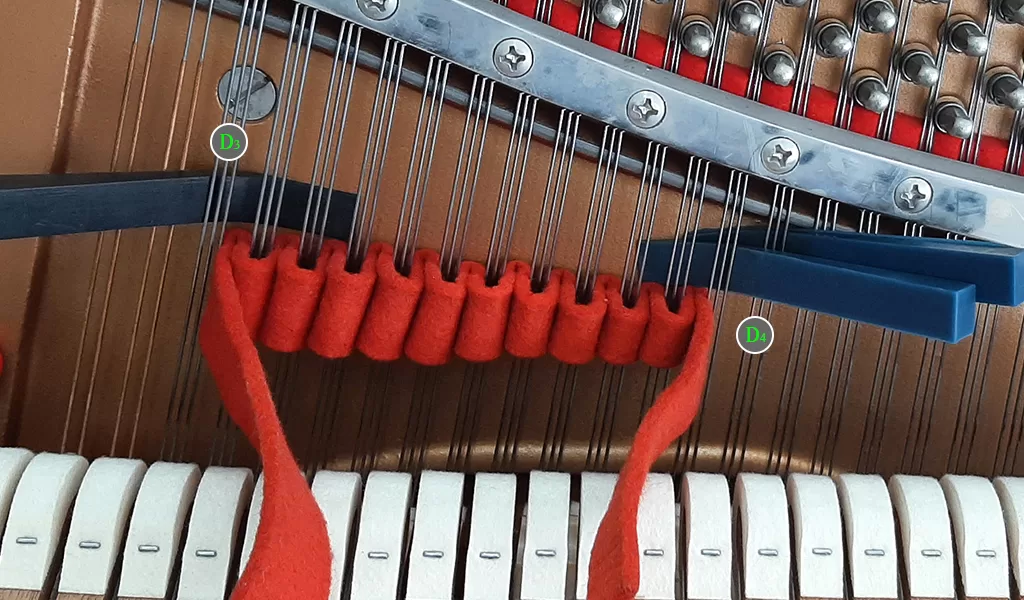
Step 3.1 (Tune the right string of D4)
Tune the right string of D4. You will not need D3 as a reference guide because the center string of D4 is already tuned. Now you can tune the right string of D4 using the newly-tuned center string as a reference guide.
- Unmute the right string of D4 by removing the part of the temperament strip that mutes the right string of D4. Your setup should look like the illustration below after un-muting the right string of D4.
- Tune the right string of D4 using the newly-tuned center string as a reference guide.
- Make sure that your “Tuning Routine” is done well to ensure optimal and stable tuning.
- Watch the video below for a visual and sound guide.
- After tuning the right string of D4, use a rubber mute or a wedge mute to mute the right string of D4. Your setup should look like the illustration below after muting the right string of D4 with a rubber mute or a wedge mute.

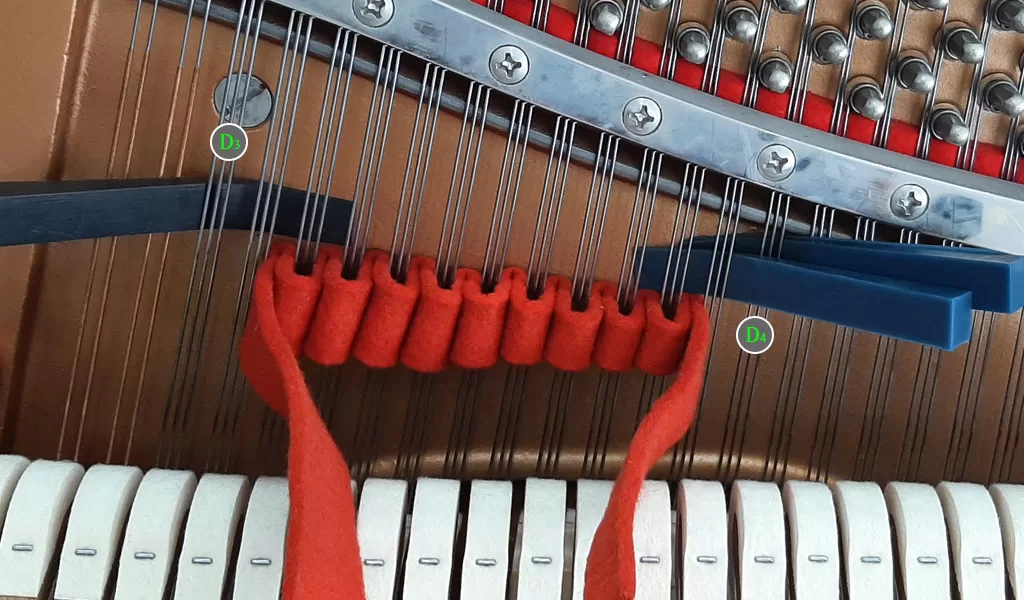
Step 3.2 (Tune the left string of D4)
Tune the left string of D4 still using the newly-tuned center string as a reference guide.
- Unmute the left string of D4 by removing the part of the temperament strip that mutes the left string of D4. Your setup should look like the illustration below after un-muting the left string of D4.
- Tune the left string of D4 still using the newly-tuned center string as a reference guide.
- Make sure that your “Tuning Routine” is done well to ensure optimal and stable tuning.
- Watch the video below for a visual and sound guide.
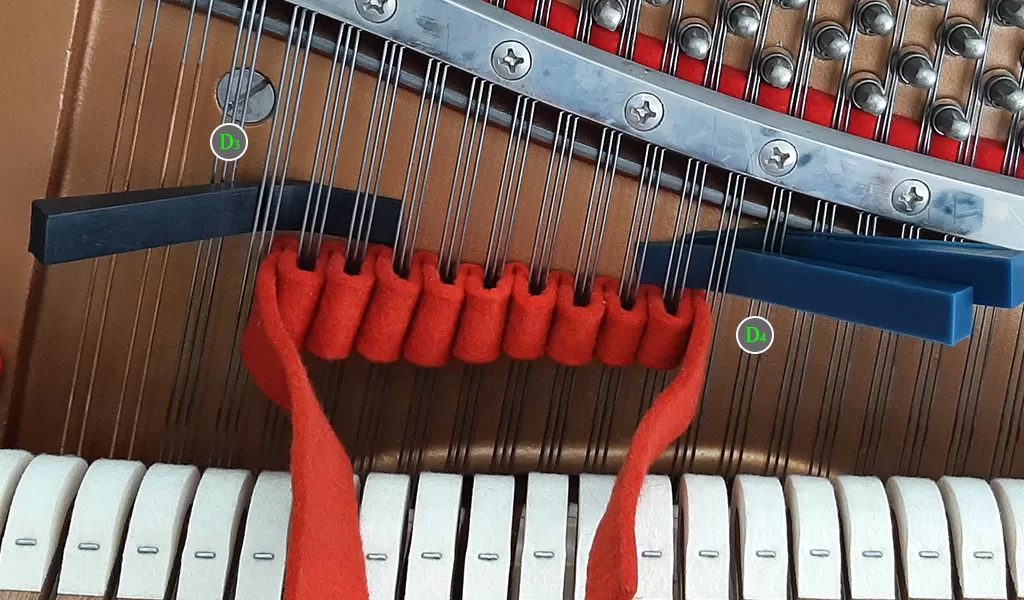
- After tuning the left string of D4, use another rubber mute or a wedge mute to mute the left string of D4. At this point, the left and right strings of D4 are muted again, but now they are muted with a rubber mute or a wedge mute. Your setup should look like the illustration below after muting the left string of D4 with a rubber mute or a wedge mute.
Notice that in Illustration 3, the left and right string of D4 is already muted again. Now D4 is ready to be used as a reference guide to tune D5.
Step 3.3 (Tune all notes “D” in the high register of the piano)
Tune the notes following the instructions in steps (3, 3.1, and 3.2). Make sure you substitute the note names according to the note you are currently tuning.
Tuning D5
- Tune the center string of D5 using D4 as a reference guide.
- Tune the right string of D5 using the newly-tuned center string as a reference guide.
- Tune the left string of D5 still using the newly-tuned center string as a reference guide.
Tuning D6
- Tune the center string of D6 using D5 as a reference guide.
- Tune the right string of D6 using the newly-tuned center string as a reference guide.
- Tune the left string of D6 still using the newly-tuned center string as a reference guide.
Tuning D7
- You have to strike the keyboard more often to tune the notes in this piano register to hear the sound change from “Dirty Sound” to “Clean Sound”. However, you still have to develop a rhythm on how fast or often you strike the keyboard. Strike the keyboard at a rate of 1 strike per second while doing the “Tuning Routine”.
- Another sound quality to listen to is when you hear the sound becomes “Crystal Bright” just like when you flick the tip of a wine glass, when you hear that “Wine Glass” sound, that is an excellent indication that the strings are already in tune.
- Tune the center string of D7 using D6 as a reference guide.
- Tune the right string of D7 using the newly-tuned center string as a reference guide.
- Tune the left string of D7 still using the newly-tuned center string as a reference guide.
Piano Tuning Step 4
Extending Octaves
Extending octaves in the low register of the piano.
Step 4 (Tune all notes “D” in the low register of the piano)
Go back to D3 and tune all notes “D” in the low register of the piano starting with D2. Tune the notes while making sure that you substitute the note names according to the note you are currently tuning.
Tuning D2
- Mute the left string of D2 using a rubber mute or a wedge mute, then tune the right string of D2 using D3 as a reference guide.
- Remove the mute from the left string then tune the left string of D2 using the newly-tuned right string as a reference guide. At this point, there will be no strings muted since there are only 2 strings.
- After tuning, mute the left string of D2.
Tuning D1
Tune D1 using the right string of D2 as a reference guide.
Piano Tuning Step 5
Closing
Step 5 (Closing the cycle)
Go back to D3 and tune the left and right strings of D3.
Closing D3
(Tuning the left string of D3)
- Unmute the left string of D3 by removing the part of the temperament strip that mutes the left string of D3. Your setup should look like the illustration below after un-muting the left string of D3.
- Tune the left string of D3 using the center string of D3 as a reference guide.
- After tuning the left string of D3, use a rubber mute or a wedge mute to mute the left string of D3. Your setup should look like the illustration below after muting the left string of D3 with a rubber mute or a wedge mute.
(Tuning the right string of D3)
- Unmute the right string of D3 by removing the part of the temperament strip that mutes the right string of D3. Your setup should look like the illustration below after un-muting the right string of D3.
- Tune the right string of D3 using the center string of D3 as a reference guide.
- After tuning the right string of D3, use a rubber mute or a wedge mute to mute the right string of D3. Your setup should look like the illustration below after muting the right string of D3 with a rubber mute or a wedge mute.
At this point in your study, you have already completed 1 cycle of tuning. You need to complete 12 cycles of tuning since there are 12 notes in the piano. You have completed 1 cycle, therefore, you already tuned all the “D” notes of the piano and your setup is ready to start tuning “D#“, also called “Eb“.
Tuning the rest of the notes…
Now you can tune the rest of the notes in the piano starting from “D#“, also called “Eb” utilizing the “Tuning Cycle”.
LESSON 6 (The Tuning Cycle)
The Piano Tuning Cycle
Piano Tuning Procedure Steps

What is the “Tuning Cycle?”
The “Tuning Cycle” is composed of some of the steps in the piano tuning procedure which you repeat over and over until you finish tuning all the notes in the piano.
Which steps in the piano tuning procedure belong to the “Tuning Cycle?”
Steps 3, 3.1, 3.2, 3.3, Step 4, and Step 5 are the steps in the piano tuning procedure that comprise the “Tuning Cycle”. After tuning all the “D” notes in the piano, these are the steps that you need to repeat over and over for all the remaining notes in the piano. (See illustration 1)
This simply means that when you finish tuning note “D” by successfully performing “Step 5 (Closing)”, then the next thing to do is go back to “Step 3” and tune the next note, which is “D#“, also called “Eb“, and carry out the steps until “Step 5”. Then begin the cycle again for the next note until you finish tuning all the notes in the piano.
SUMMARY

Message from Pro Piano Tuner
Congratulations on completing the Prime Piano DIY Piano Tuning Guide on how to tune a piano!
You already have the basic skills and knowledge about tuning a piano using more of a practical approach rather than a purely technical one. This is not the normal way nor the universally accepted method of learning how to tune a piano. However, this method has already been tested for 3 generations, and it works. I, myself, was taught how to tune a piano in the same way by my father and my grandfather before him.
Remember, you will need to constantly and regularly practice this skill to improve it, just like any other skill set. Dedication is the key to success. The more you practice, the better your piano tuning technique and tuning quality will become.
Good luck to you!
Pro Piano Tuner